How to move your school from spreadsheets to EDU-v01 in a week
A day-by-day plan for bringing students, guardians, fees and opening balances from Excel into EDU-v01, checked before anything is saved.
Kode Nexus team4 min read
Most schools don’t stay on spreadsheets because they like them. They stay because moving feels risky: years of student records, guardians’ phone numbers and unpaid fees, spread across files that only one person fully understands.
EDU-v01 was built with that move in mind. Its Data Import screen takes one Excel template, checks every row with the same rules as the app’s own screens, shows you the result before anything is saved, and then imports everything or nothing. Here’s a plan that gets a typical school across in a week.
Before you start: pick your go-live date
Go live at the end of a term. EDU-v01 starts billing from the next term, and every amount still unpaid in your old system comes across as an opening-balance invoice with its own number series and due date. Advances parents have already paid are carried forward onto their child’s first regular invoice.
Write down two numbers from your old system on that date, because you’ll need them later:
- the total still owed by all students, and
- the total paid in advance.
Day 1: download your school’s template
In EDU-v01, open Settings → Data Import and download the template. It is generated for your organisation: it has dropdowns for your own values, and a file made for one school can’t be imported into another.
Rows refer to each other by names and codes, never by database ids. A student’s section is written
as 5-A, not as a number you’d have to look up.
Days 2–3: fill in the core sheets, in order
The core sheets build on each other, so fill them in this order:
- Academic Year & Terms
- Programs (grade levels, or degree programs)
- Subjects
- Sections
- Rooms (can be empty)
- Students, together with their Guardians
- Emergency Contacts (can be empty)
A few things that save time:
- Dates must be real dates. A date typed as text, such as
03/04, is refused, because nobody can tell whether it means 3 April or 4 March. If you save a sheet as CSV, write dates as2026-04-03. - Keep your own student numbers. Students arrive Enrolled, with the numbers you already use.
- Section capacity still applies. A section can’t take more students than its capacity, just as on the Student Directory screen.
Day 4: upload and do a dry run
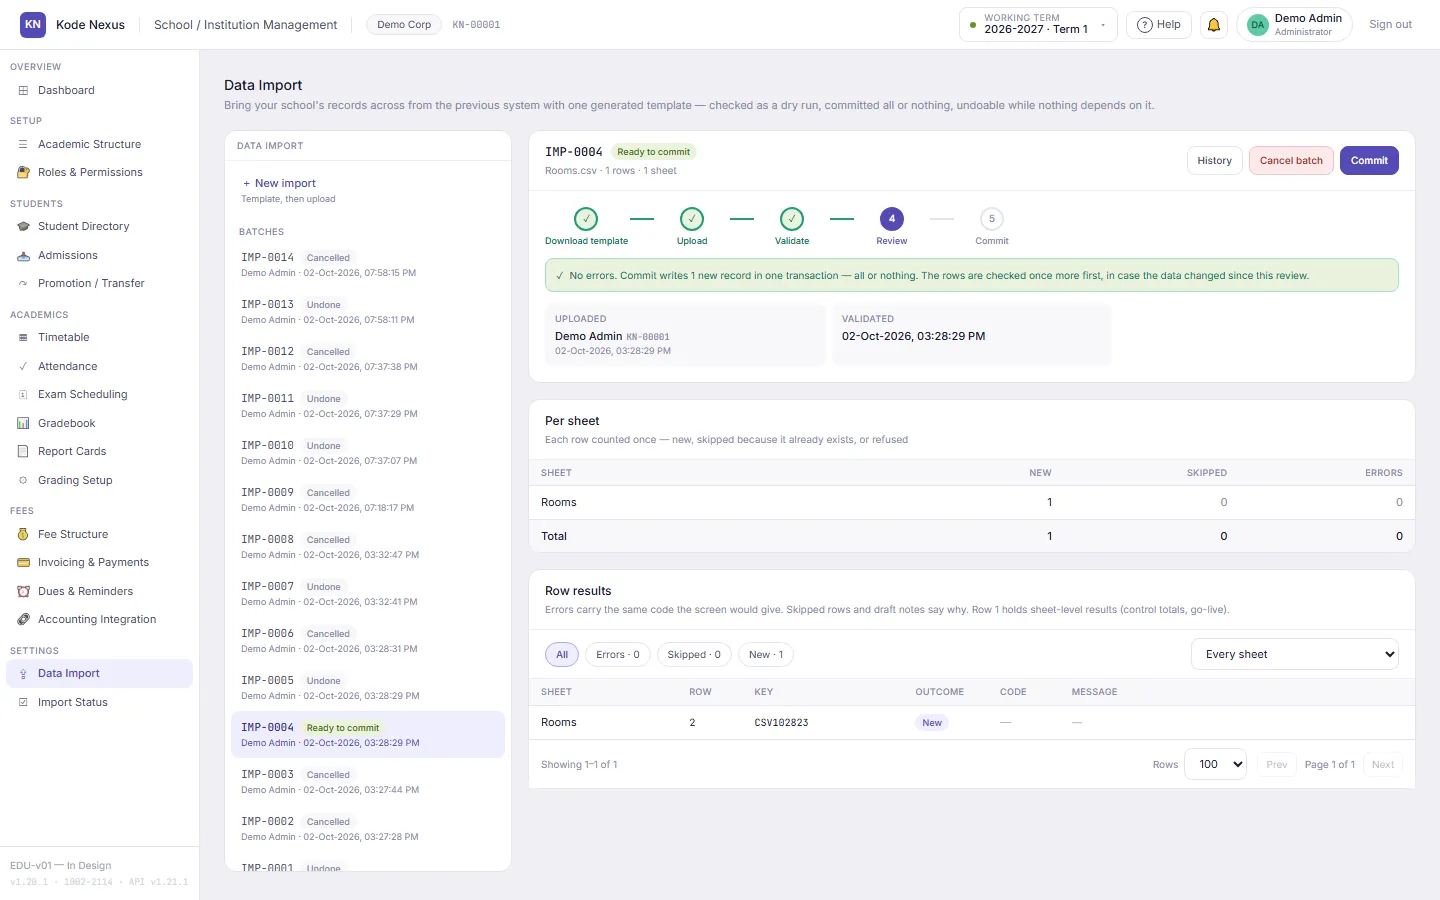
Upload the file. EDU-v01 validates it in the background and shows, per sheet, how many rows are new, how many were skipped because they already exist, and how many have errors. Nothing has been saved yet.
Each error carries the same code and message the app’s screen would show, so “section full” reads the same in the import as it does on the Student Directory. Download the error report, fix those rows in your spreadsheet, and upload again. Repeat until the errors are gone.
Day 5: the optional sheets
Once the core is clean you can add more, either now or later:
- Teaching Assignments: who teaches what to which section, with the teacher matched by their email address on Kode Nexus.
- Assessment Types and Grade Bands: an incomplete set imports as a draft, and the import tells you why it’s incomplete.
- Marks for terms of the current year that have already started.
- Fee Heads and the Fee Structure for each grade and term.
- Opening Balances: one row per amount owed or paid in advance.
Remember the two totals from your go-live date: the import won’t commit opening balances unless they add up to those totals exactly. If the sheet’s total and your old system’s total disagree, you find out now, not when a parent disputes a bill.
Day 6: commit, and undo if you need to
When the review looks right, commit. The whole batch is written in one transaction: either every row is saved or none are. Every record it creates goes into the audit trail with the name of the person who ran the import.
Changed your mind? You can undo a batch while nothing depends on what it created yet. Once a teacher has entered marks against an imported section, for example, EDU-v01 stops the undo and tells you exactly what is now using those records.
Day 7: check, invite and go
Open Settings → Import Status for a readiness checklist of what’s in place and what’s still missing. Then invite your staff, give each person a role (Principal, Teacher, Fee Officer and so on), and you’re running.
Prefer us to do it?
During onboarding, the Kode Nexus team can run the import for you. Once your organisation is live, we can only do it while your owner has granted us support access, which lasts 14 days and can be withdrawn at any time. Every change we make is recorded under our own name, not yours.